Marking ceilings for myriads of purposes is a daunting task.
With your neck craned backward, it is always difficult to ascertain that whether the lines or markings you have made are aligned, straight and clean.
And, add the task of using old-fashioned ruler while perched on the ladder, you have a task which needs some serious patience and determination.

However, it doesn’t have to be that hard especially if you use laser levels for marking ceiling. And, if you are an electrician and have to work on ceilings on the daily basis, a laser level is a must for you.
Why Use a Laser Level?
The cross line laser level makes a lot of archaic tools and long stretched steps redundant.
It radically improves the quality of the markings and accuracy would certainly be off the charts as you take the possibility of manual errors out of the process.
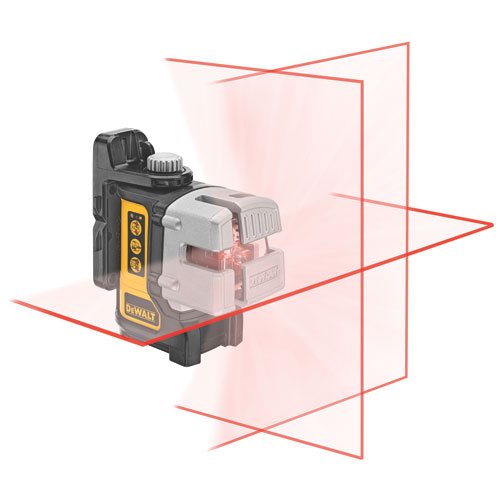
Before we move on to the actual process that details how to use a laser level for marking ceilings, I think it is important to have a brief on the device we would be using for it. It would make it easier to understand the steps to be taken in the process.
The cross-line laser level projects beam in a vertical as well as a horizontal plane.
So, it makes a perfect choice when you are looking for alignment in both planes at the same time. It significantly reduces the time taken
It significantly reduces the time taken for any particular task because you don’t have to check alignment in both planes separately.
For example, if you are installing the wall cabinets, the cross line laser level will help you in ascertaining whether the cabinet corresponds to horizontal and vertical alignment.
You won’t have to waste time in making length measurements, using manual levels and making markings with pencil on the wall.
For the sake of ease of understanding, we are going to make markings for recessed lighting that has to be installed on the ceiling. Having a subject of reference will make it easier for you to understand the whole process.
How To Use Laser Level For Marking Ceilings - Step by Step Guide
Moving on to marking ceilings, here are the steps you need to follow.
Step 1: Begin by taking the measurement of the ceiling.
Scale down these measurements and put it down on the graph paper. You can use standard ratio considering ¼ inch as one foot.
Step 2: Next step is to determine how much distance you want to install recessed lights.
Again scale it down and put it on the graph paper. This will help you get an idea of the placement of the lights. Yes, you can completely skip putting it down on graph paper and move ahead.
However, then you risk making a mess of the job. It really blows when you have made markings on almost the entire length of the ceiling and find that the last one can’t be installed. The graph paper will facilitate proper execution of your plan.
Step 3: Start from one corner. Place the cross-line laser level at an equal distance from both walls. The distance is equal to how far you want lights away from the wall.
Step 4: Also, place the laser level in such way that one laser beam runs parallel to the wall and another climbs vertically along the same wall.
You will also notice that the laser beams intersect on the ceiling just above the laser level.
Step 5: Let the laser level remain at the fixed spot.
Along the line thrown parallel to the wall, make marking according to the distance you want between lights using a laser measure.
Make series of markings all along the line by repeating the before-mentioned process.
Step 6: Move the laser level to the point marked nearest (which is first marking was well).
While placing, make sure that the laser beam that is emitted parallel to the wall, crosses all the markings.
Mark the point on the ceiling where the laser beams intersect.
Step 7: Move the laser level to the next marking and repeat the process.
Step 8: Keep on moving the laser level to cover the whole span along that particular wall.
Step 9: Repeat the entire procedure for other three walls.
Conclusion
The process mentioned above might be bit drawn out and tad complex but if you follow the steps exactly, you will certainly accomplish it successfully.
The key in the whole process is the placement of the cross-line laser level. So, for all the steps of the process, make sure the laser level is properly aligned. Also, checking the calibration and accuracy of the laser level beforehand is advised.


