Do you want to give the walls of your home some fun zip and decorative touches but can’t seem to get the ideal wallpaper or decals to match your budget, style, and colors?
The good news is that you can DIY your wall decors with polka dots of any size.

Painting circles and dots on the walls can seem to be an easy DIY choice of decoration, but you cannot carry out this task successfully and accurately without having the right tools and knowledge.
If you are looking for the right information on how to customize your blank walls with polka dots to spruce up the look and feel of your home, you are in the right place.
This article will show you the step by step guide to painting circles and dots on your walls to achieve a beautiful and accurate wall decoration.
Why Should You Try This Wall Painting Idea?
Painting of circles and dots on the walls is a great decorative technique that comes with some benefits. Some of these benefits include:
It allows for creativity
With polka dots, you can choose and combine any color and pattern of your choice to spruce up the appearance of your home.
They are versatile, allowing you to create your own pattern to match your style and colors and coordinate them with various design styles.
Painting the dots and circles are not limited to the walls of your living room or bedrooms, they can also be added to any walls of your kitchen and bathroom.
See also: How to Paint Your Bathroom Tile?
It is pocket-friendly
No doubt! Polka dots will beautify your walls and give your home an overall aesthetic improvement if they are properly painted.
But the great news is that you can add some fun zip and give your walls great decorative touches without spending a fortune.
Painting of circles and dots on the walls is very easy to carry out. To paint polka dots, you don’t have to be a specialist, call on a pro or spend a lot of money to transform your walls.
How To Choose The Right Dot Painting Patterns?
Choosing the right dot painting patterns and color is one of the dilemmas as well as the critical success factor of painting dots and circles on a wall.
** Select the Right Color
The first step in selecting the right color is to decide on the area you want to paint. Check the area and select the color that will go well with your base coat.
You can go with a single color or alternate between varieties of colors.
Aqua/orange or navy/red combos work great for a playful boy’s room. For a baby nursery or a little girl’s room, pastels work great!
You can also mix a balance of cool and warm colors or select the ones that are on opposite sides of the color wheel.
If you have a good eye for colors or you are more experienced about color selections, you can go by what your instincts tell you.
** Size of the Dot Painting Patterns
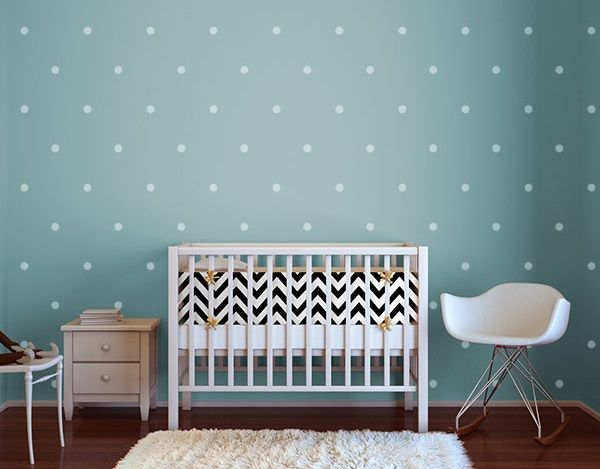
The scale is another thing to consider in choosing the right pattern for a room.
Smaller patterns look more like a texture from a distance, while smaller dots tend to look more childish.
You can also layer your circle and dots with other patterns to give your walls a sophisticated piece of design.
** Matching the Color and Patterns
Simple patterns and soft colors feel lighter and reduce visual load; they, therefore, tend to be more suitable for smaller rooms.
Saturated colors and bold patterns increase visual weight and work well in larger rooms.
When selecting colors and patterns, always go with the ones that match your style and personality.
After all, you would be happy and comfortable with the color and the pattern you choose and not by the rules given to you by a decorator.
How To Make Circle Stencils For Wall Painting?
There are various ways to make a circle stencil, some of which will be discussed below.
1 - Using a Circular Object
Find a circular item as big as the size of the circle you want. You can use dinner plates or cups for larger circle and coins for smaller ones.
Place this circular object on the cardboard or clear plastic sheet and trace the object with a pencil or marker.
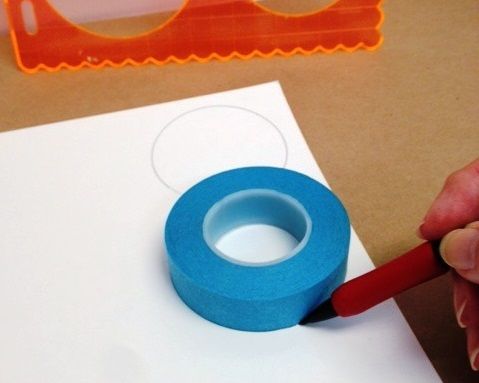
After tracing out the circle, place the cardboard or clear plastic sheet on the cutting mat and cut out the circle with your craft knife.
Be careful when cutting out the circle to make a clean and smooth cut as possible.
Remove the cutout circle; you can smooth out any imperfections by using fine grit sandpaper on the edges of the circle you made on the plastic sheet.
Note: you can use A4 papers if you cannot get cardboards.
2 - Using a Pencil Compass Or Circle Cutter
Select the length of the circle radius you want to cut and place the compass on the card stock paper to draw the circle.
You can increase the length of the radius to make bigger circles for a variety of spot sizes. Cut out the circle with your craft knife.

The use of a circle cutter is easier and faster.
Place the cardboard or the blank stencil on the cutting mat and select the desired size of the cutout circle.
Place the circle cutter on the cardboard or plastic sheet and cut out the circle.

One of the best ways to make a circle stencil is by using a die cutting machine. While this method is faster and more effective, it allows you to make and cut out various kinds of patterns to spruce up the appearance of your walls.
You can also visit a craft store or shop online to purchase pre-made circle stencils or blank stencil sheets.

Supplies Needed to Paint Circles on Walls
- Paint colors
- Cardboard, clear plastic sheet or A4 paper to make the stencils
- Compass, round object(s) for pattern
- Blank stencil sheets or Pre-made circle stencil
- Pen or craft knife
- Cutting mat
- Mini rollers and trays
- Paint brushes
- Daubers
- Masking tape
- Stencil
- Tape measure or ruler to measure the gap between circles
- Carpenters level or a laser level
- Pencil
Step-by-step Guide on How to Paint Circles on Walls
Step 1 - Preparation the Walls and Room

Determine the walls you want to paint and clear the room for painting.
If the wall is blank, paint the base coat with the desired color and leave for about 4 hours or overnight to get the best result.
If the wall is already painted, you can use the color as your base coat.
Read more: How to Prep Walls Before Painting?
Step 2 - Plan Your Design
Determine the pattern, colors, sizes and the numbers of the dots you want and mark where the center of each dot will be with a small tape or pencil.
You can alternate between colors and sized for a more attractive look.
Step 3 - Tape The Stencils on The Wall
If you can make as many stencils as possible, you can line them on the wall as shown in the picture below.
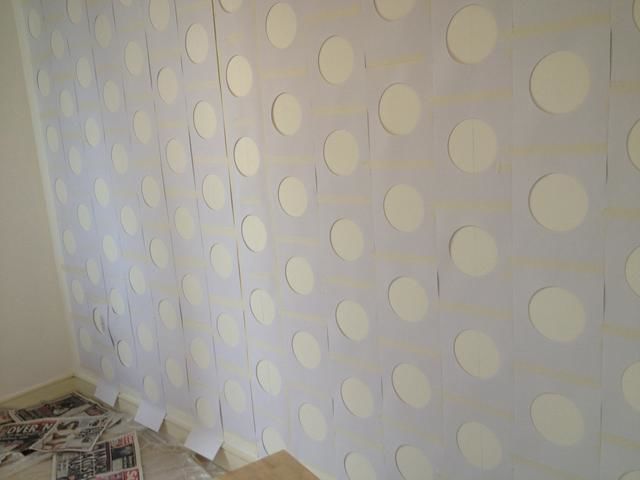
Plan the color and label the paper. You can label the color of the center of the dot you want to paint if you intend to alternate between colors.
Step 4 - Paint the Dots
Paint the colors with a mini roller or a painting brush (preferably, a color at a time) starting from the edge of the circle to the center to prevent seeping the paint under the stencil. You can add a second coat of paint if necessary.
Note that you have to remove the stencil carefully and move it to the next spot your marked or labeled if you are working with a few stencils.
Apply the desired paints with care and keep moving to cover all the areas you marked.
Once dry, remove the stencils to reveal the beautiful and perfectly round dots.
Useful Tip
To safely reach to the highest point of the wall, use a painter scaffolding system that comes with a foldable tool shelf to hold your painting tools.
Conclusion
Now that you have known how you paint circles and dots on a wall, why don’t you take advantage of it and give your walls the decorative touches it needs.
Now is the time to take your home decor to heart. Pick up your supplies, add polka dots to transform your walls and have fun!


