It is such a delight to see more people embracing emission-free renewable energy, solar energy in particular. Solar energy is gradually outpacing grid electricity thanks to zero carbon emissions and significant cuts in costs.
You've probably had the desire to take the plunge, decarbonize your electricity and join the happy and satisfied community of solar users. And your desire may have possibly been put off by the thought of having to fiddle around to mount and set up the panels.
Thankfully, herein, we've got you covered with the best ways to install these panels of goodness. Shall we have a look?

Solar Panel Installation: DIY or Hire Professionals?
If you are the handy techy who was born with a screwdriver in your hands and you do not mind spending a day or two driving lag bolts and assembling the prefabricated parts, you can choose to set up the panels yourself.
But those of us who do not like going through the hustle should not hesitate to seek the services of the best solar installation company to handle the installation for them.
Let's check out how each of these approaches applies.
Do-It-Yourself (DIY) Installation
Before you get down to mounting the panels on your own, confirm that the building authorities of your locality permit self-installation. Some authorities will demand that unlicensed professionals and DIYers need to pass some tests and demonstrate their basic electrical skills.
You will need to apply and process the permits, which can be a pain, and comply with the inspection criteria. Even more, if you will be operating off-grid, then you need not seek the involvement of the utility company. Moreover, DIY solar installation entails having to invest in workable DIY solar panel kits.
Feel free to hire solar professionals to assist with specific aspects of the process which you may not be familiar with.
Cost-effective
You are free to customize to your liking
Satisfaction of working on your projects
Requires installation tools and some technical know-how
Involving and time-consuming
Hiring Professionals
If the installation procedure is a little too labor-intensive for you or you want to save yourself the trouble of mounting the panels, you can always seek the help of professional installers.
The best part, solar installation specialists will handle much more than merely mounting the panels. The licensed experts will help you determine your power needs and decide on the number of panels depending on the number of sun hours in your location. They also assist you to acquire permits and meet the specific electrical standards for inspection.
Who are the best solar panel installers near me, you ask? Well, you will need to check references and licensure and identify capable and reputable licensed solar installation experts. Also, check with the technical support team of your solar equipment suppliers for any recommendations of their preferred technicians.

Professionals have proper expertise and tools to
Professionals will complete the job more efficiently and quickly
They will take care of the licensing and inspection procedure
More costly due to labor expenses
Some professionals are inexperienced and unskilled
Where is the Best Place to Install Solar Panels?
Ideally, the best place to install solar panels should be on a raised open surface facing the direction that the sun sets from. You can choose to install the panels on your roof, ground or have them floating on elevated mount stands. But before you proceed to the mounting part, you need to keep in mind a number of factors.
What Should You Know Before Installing Solar Panels?
Below are factors you should take into account before choosing where to install solar panels:
Power Demand
You need to estimate the total amount of electricity you need to sufficiently power the lighting systems and the electrical appliances in your home. Ensure the number of panels you purchase can generate enough to fully meet or at least offset some of your electricity needs. Those who are already connected to grid electricity can easily obtain their periodic power consumption by checking their power bills.
Which Type of Roof is Best for Solar Panels?
The best roof design for solar panels is standing metal roofs with standing seams that let you install the panels without the need for drilling into the roof. Desirably, the roof should be tilted by about 30 degrees. If your roof is not sloped, you will need to install brackets to angle the panels but if it's flat, simply make use of mount rails.
How Much Weight Do Solar Panels Add to a Roof?
Looking for a sturdy and firm surface that can withstand the weight of the panels without caving in and ultimately set you back more money for repair. A standard panel weighs about 30 - 50 lbs which are well within the capacity of most standard roofs.
For pitched roofs, the added weight is lower at about 2.8lbs. per square foot compared to flat roofs where the figure almost doubles to around 5lbs per square foot. Reach out to a qualified architect or structural engineer to help you evaluate if the roof can stand up to the weight of the panels you intend to mount on your roof.
Avoid brittle roofing materials like wood and slate roofs. If the roof is not robust enough you could repair, replace the roof or add beams or rafters to support it.
Needless to say, more panels mean more energy production. Along with that, the number of solar panels you can install depends on the physical size of the site or roof you intend to set them up.
Compare the dimensions of the solar panels with the available mounting space and ensure that they will fit well. Not just that, you will also want to make sure there is enough real estate to accommodate more panels in case the need arises in the future.
Exposure to Sunlight
The number of sun hours in your location will determine the number of solar panels you will install.
Check that the venue where you plan to position the panels has maximum exposure to sunlight even with changes of the seasons or future construction in the region. Avoid areas that are obstructed from the sun by obstacles such as buildings or trees.
Which are The Best States for Solar Energy in the US?
Different locations and states have different rules and legislations concerning solar installations. Visit the zoning department, city or town authority, and homeowners association if any, and find out what permits and procedures are required.
What's more, you need to figure out how your region or state compares with other areas in matters of solar adoption. The best states for solar panels include California, North Carolina, Nevada, New Jersey, Arizona, Texas, and Massachusetts. They are not only states with the best solar incentives but also receive a considerable amount of sunshine all year round making solar energy harvesting viable.
Necessary Tools and Equipment to Install Solar Panels
You need not have that many tools to see you through the installation process. A few basic household tools like a hammer, pliers, screwdriver, wrenches, tape measures, and more, and you will be good to go. Check the instruction manual if any for the required tools before investing in any.
It is advisable to settle for solar panel starter kits which usually provide all the must-have tools rather than buying each tool individually. Besides being more affordable, these kits will save you the time you'd have put into shopping for the tools separately.
Below is a checklist of the most crucial equipment necessary as far as successful solar installation goes.
Anchoring Tools
Anchoring and securing the panels to the intended position is no child's play. You need hammer rails, lifting brackets, and solar panel hangers for securely mounting the panels to the intended space.
Power Tools

Those who will be working on pitched roofs or tilt leg installations will need power tools like a drill and impact driver. A drill is a handy tool when installing railings, securing transmission lines, and more. Along with that, make sure you get drill bits, sockets, caulking guns, and utility knives which are necessary when using your drill.
Consider opting for cordless battery-powered drills to save yourself the limitation of dealing with cumbersome wires.
Electrician Tools
You cannot do without electrician tools in your installation arsenal. PV testers will be instrumental in accurately checking the power quality that is put out by the solar cells. Also, you need insulation pliers for holding powered wires without the risk of electrocution. Wire cutters and wire strippers are also crucial.
Safety Tools

If you will be working at heights, no doubt you will require safety tools like fall protection gear. You will also need to make arrangements for harnesses, ropes, safety glasses, earplugs, boots, and helmets among others.
Other requirements worth mentioning are sealants to make watertight screw holes you drill into the roof so no rainwater can leak through.
How to Install Solar Panel System at Home
So you've decided to go solar? Great! Ahead is a step-by-step guide to instruct you on the best way to install solar panels on the roof.
#1 - Purchasing the Solar Panels
Of course, you will first need to shop around for the best deals and buy the solar panels and bring them home with you. If you are in a comfortable financial position, you can pay upfront. But should you be short on funds, consider getting a financing plan which allows you to pay in bits for a couple of years.
On top of that, check for available state and federal policies, discounts, government incentives, and rebates in your location that can help you save a significant chunk of cash. Make sure you have secured the permits, solar renewable energy certificates or SRECs, and other necessary authorizations.
#2 - Identifying and Checking the Location
Before you set out to mount the panels, you have to find the best place to install the panels. Ensure the venue has maximum exposure to sunlight even with changes of the seasons or future construction in the region. Avoid areas that are obstructed from the sun by obstacles such as buildings or trees.
Whether or not you will be doing the installation, we recommend having a professional take a look at the platform or roof you intend to install the panels on and determine if it is structurally sound and safe for the installation of the panels. The engineer will also assess your electrical system to find out the ampere capacity can easily support a solar energy system.
#3 - Setting Up the Mounting Platform
You will require brackets, bolts, or clamps to mount the panels, then install brackets if the platform or roof is sloped or mount rails if it is flat. Mount rails will enable you to tilt the solar to the appropriate angle that ensures maximum exposure to the sun. You can purchase the mounts from home improvement stores or solar component suppliers.
Make sure the brackets or rails are tightly secured to the rafter beams or trusses of the roof rather than the sheathing. More than that, ensure the panels are sitting at the same height and angle regardless of whether the roof is even or not.
Consider the size of the panels when building the mounts. Make sure it is strong enough to stand up to the harshest of weather conditions. Check for any instructions that may have accompanied the brackets or rail system and try to install them if you install them in adherence to the manufacturer's recommendations.
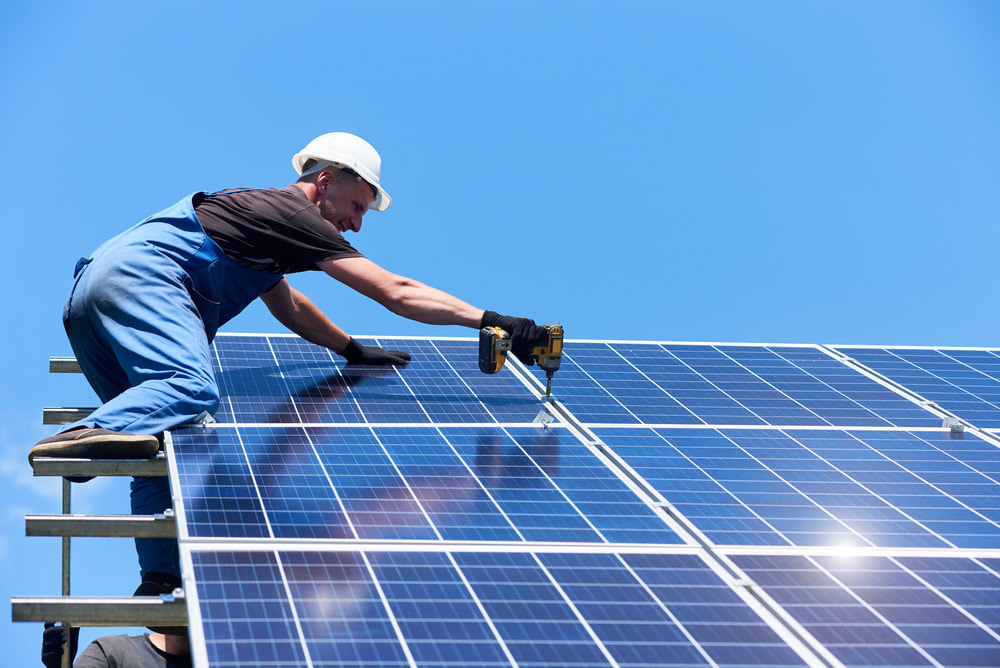
#4 - Mounting the Panels

Carefully hoist the solar panels on your roof and lay them out onto the mount rail or brackets. Secure the panels and on the rails or brackets using provided screws and bolts. Connect the panels together according to how you intend to have them produce power.
Be careful not to let the panels accidentally slide off, especially when working on very sloped roofs.
#5 - Wiring
To begin with, run conduits from installation to the processing panel inside your house. Conduits with waterproof sealing will not only prevent contact of the wires with rain, sunlight, and other elements but also protect from electric shock.
Wire solar modules together making use of junction connectors or a fuse combiner box. Check the provided instructions to guide you through the connections.
Afterward, link the exterior wiring to the interior control panels to allow the flow of power from the first photovoltaic component in your system (usually the disconnect) to a charge controller and storage battery or the inverter depending on the type of connection.
Keep in mind that solar power installations involve the use of three wires: the negative, positive, and ground wire. All the wires ought to be insulated properly and waterproofed (wrapped with insulating electrical tape). That's not all.
To be safe from electrocution when installing the panels, connect a wire from the mounting system to the ground. Install earthing rods on the ground leaving around 6 inches exposed out of the ground.
Earth the solar panels and the mounting system to protect your home against electrical shocks, electrical fires, and lightning which may bring about a power surge.
If you are not sure if you can do the wiring, do not hesitate to call a professional since this stage is very crucial.
#6 - Connecting the Electrical Components
Join the electrical components depending on the type of solar connection you've opted for. Correctly connect the panels, charge controller, battery, and inverter. After that, you can channel the power from the inverter and direct it to the main electrical control panel of your house.
#7 - Testing the Solar Panels System
After you've installed them, carefully check the connections and installations to make sure they have been done properly. You can then power on the energy system to check if it is properly harnessing the energy and powering your home.
How to Install Solar Panel on a Car Roof
If you are an on-the-go electricity user who spends time traveling and camping in your car, RV, or motorhome and spending time away from civilization, you may need to supplement your energy supply to meet the demand of your power appliances.
Manufacturers are well aware of the limited roof size and the trouble that comes with carrying around the panels mounted on top of the roof. So, they've produced specialized portable solar panels that are easy to mount and unmount from vehicles.
They are also more sizable, compact, and flexible than residential rooftop installations. Moreover, other suppliers offer equipped motorhome solar panel kits that include most of the necessary components.
Aside from that, it is advisable to go for monocrystalline solar panels. These panels are lightweight, more efficient, and concealable.
Tools to Install Solar Panel on a Car Roof

Car with a roof rack
2 solar panels
Deep cycle battery for storing energy
Power Inverter for converting DC electricity to AC electricity
Charge Controller for preventing overcharging of your storage system
Solar adapter cable
Screws and bolts
An inch thick plywood for mounting solar panels on
Plastic sheet
Eternabond tape.
Steps to Install Solar Panels on Car Roof/RV/Motorhome
To begin with, you do not want to drill multiple holes on the roof of your car. So, we will root for using Eternabond tape to secure the panels. Stick a strip of the sticky tape about a half-inch border around the edges of the panel, not to cover the actual solar cells with tape.
You can use a small pressure roller to smooth the tap and make sure the tape is firmly pressed down. Ensure the panels are protected from harsh weather, they are aerodynamic, and won't fly away when your automobile is moving at a very high speed.
Install the solar panels onto the top of a thin plywood board or sheet of metal.
Connect the solar panels to the solar charge controller.
Link other cables from the controller to the deep cycle battery.
Connect the inverter to the battery. From the inverter, you can then tap Ac electricity to power your appliances.
Consider fitting a disconnector switch between the controller and the solar panels to make for easy power disconnection if need be. You will also want to add an inline inverter fuse between the storage battery and controller to reduce overheating.
Tip to Maximize the Efficiency of Solar Panels On Car Roof
When choosing a charge controller, opt for a Maximum Power Point Tracking (MPPT) charge controller rather than a Pulse Width Modulation (PWM) controller despite the higher cost of the former. MPPT controllers maximize your power potential by converting excess voltage from the panels into amps and minimizing loss of power through the cables. They are ideal if you have plans of expanding your solar capacity in the future.
Solar Panel Installation Safety Tips
As with most DIY projects that involve working at heights, installing solar panels involves risks and accidents. We do not want you to fall victim to avoidable accidents. That said, we want to equip you with every safety precaution you need to put in place.
When lifting or hoisting the panels, ensure you are at least two people by seeking the aid of a friend to ensure utmost safety. Moreover, use mobile carts or forklifts to move around the panels.
During climbing, avoid carrying panels in your hands. Utilize cranes, hoists, or winch systems to lift them.
If you will be working from higher than 6 feet, make sure you install guardrails around ledges, sunroofs, or skylights. Alternatively, use safety nets or body harnesses to arrest in the unfortunate case of a fall. Consider using scaffolds and not ladders when working at heights 6 feet and more.
Always put on personal protective equipment like hard hats or helmets, gloves, and steel-toed shoes with rubber soles. Put on protective gloves when handling solar panels.
Inspect the ladders and scaffolding and confirm that they are in prime shape. Ensure the ladder you are using is made from sturdy material preferably metal, is extendable or high enough, and is placed on dry, level ground away from electrical wires
Be careful not to sit or step on, drop stuff, or apply pressure on the panels lest they break, get damaged, or injure you.
Avoid working when it is raining due to the high possibility of slipping and falling.
Never put on metallic jewelry when working on the panels since they may cause electric shock.
In case of electrical wires attached or near the roof, reach out to the utility company to help disconnect and prevent the risk of shock.
Solar Panel Installation FAQs
How much does it cost to install solar panels?
Do you need permission to install solar panels?
Absolutely. You need to secure permits like solar renewable energy certificates or SRECs and other necessary authorizations. You need authorization from your local building authority to permit new constructions. Also, if you intend to interconnect to the grid, you need a permit from your electric company.
Apart from that most states will demand that you acquire a licensed electrical or plumbing contractor for PV systems, respectively.
Are solar panels bad for your roof?
How to Install Solar Panels - Verdict
Installing solar panels may not be rocket science, but it is certainly not a cakewalk. We have brought you the correct plan of action of installing the panels right in front of your eyes.
All you have to do is just follow thoroughly and adhere to every measure we have mentioned and you will be good to go.


